Monday, April 8, 2013

Introducing Our Son...


Our son Ansel Norman was born this weekend. arriving early Saturday morning at 2:23 am and just a little less than a week before his due date (gotta love that!).  We are all doing well. His Big Sister is over the moon in love with him. She claps in the morning after waking up to find that Ansel is still here!! (I hope this feeling lasts! lol) It's been a great past couple of days and we are excited to see how this all plays out, what type of little guy Ansel will be and his relationship with his sister and with us of course. It's very exciting.  Here are just a few pictures... I hope to return to a some what regular blog schedule next week-ish!

xo
abs


Thursday, April 4, 2013

Links and Such


Hi All, Happy Thursday!  I like the above quote... it reminds me of when I was a camp counselor and after being particularly goofy a camper told me "You're Weird!" she said it admiringly (I tell myself). But honestly whenever I've received this observation I've chalked it up to that person's sheltered exposure to Awesomeness.  ; ) Below are some links and things I've been book marking this week. Have a great Thursday!


adorable little girl's swim suit
Recipe: How to make coconut butter
Organization Inspiration: Tea Drawer
Reupholstery yardage chart
How to Prepare a Toddler for the arrival of a new baby
Parrot Lamp
Adorable knit goods
Money saving and budgeting concept: the 7 bank accounts every family should have
FYI: How to get out Dry Eraser Marker stains from clothes (this happened to our daughter's new hoodie... rubbing alcohol helped a lot)

And our Master Bedroom makeover... more updates and pictures to follow tomorrow!

Wednesday, April 3, 2013

A round up of Landscape and Nature themed Artwork for our Bedroom


As I mentioned in yesterday's Bedroom makeover post, I would love to have a new piece of artwork above the bed. Artwork qualifications are- something subdued in color and of a landscape or nature related subject matter. Here's a little round up of what I've been finding...


And below are a few photoshop mock ups to get an idea of what these pieces would look like in the space.


It's so interesting to see what they look like above the bed... photographs that might not be a first choice, suddenly read very well and much better than others...!

We shall see...!?


Tuesday, April 2, 2013

Before and After: DIY Headboard Makeover

As I mentioned in last month's Bedroom Makeover post, I've had a real desire to make over our master bedroom with the goal to make it more subdued, neutral and cohesive, less visually busy and thus more of a retreat.  I wanted this bedroom makeover to be a gift to the husband and myself, a little 
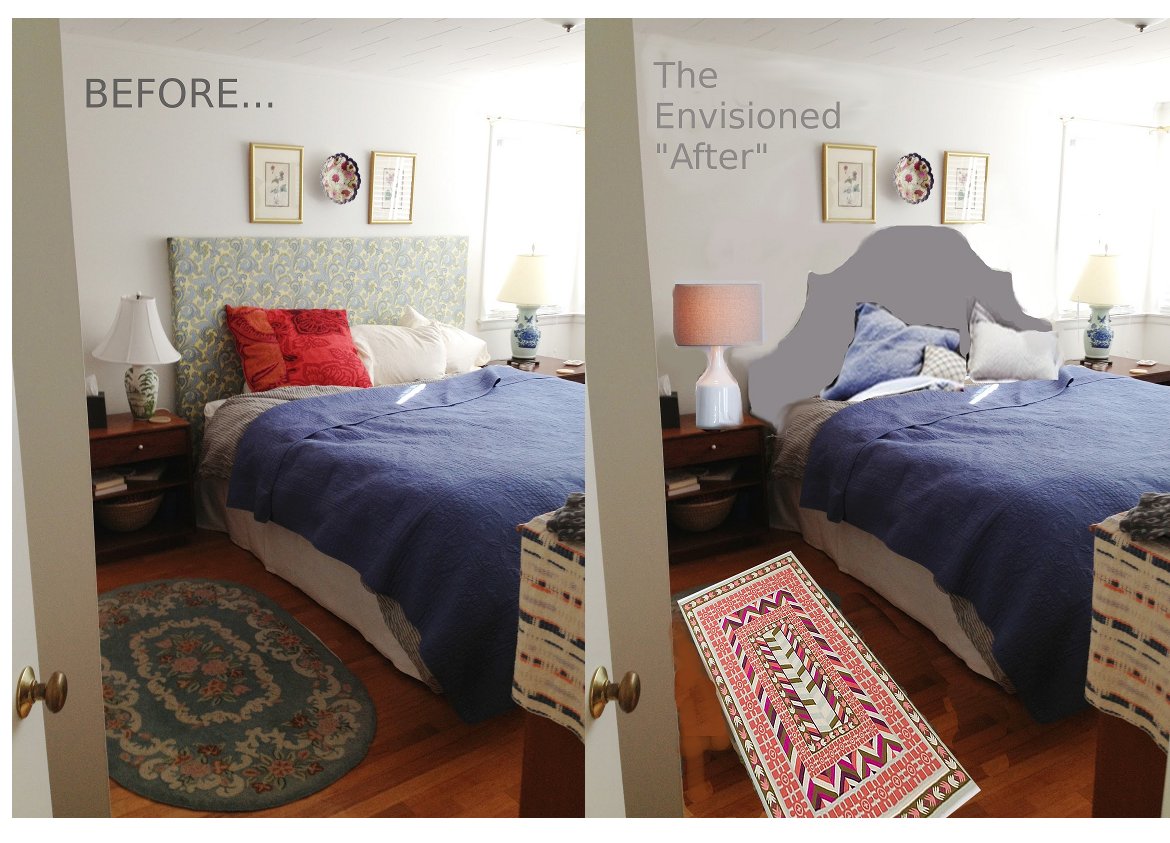
"Treat yo-self" moment... the ultimate gift for when we become the parents of two children (any day now!). ABOVE is our original bedroom beside my photoshop envisioned room makeover inspiration. Scroll down to the very bottom for the AFTER shot! ; )

Side note: It's funny that 3 years ago, and the last time I was pregnant, we made our original king headboard and for only $70! And now here we are, pregnant again and remaking and fine tuning our headboard. Anyway, here's a little tutorial on how we made over our king headboard. 


First we pulled out the original staples from the recycled quilt lining, allowing us to draw out our outline and cut out the final shape.


After messing around with a few sketches, I settled on the bolder line outline. I looked around for headboard inspiration and found this classic headboard shapes image very helpful.


Then I traced the outline onto tracing paper- in order to repeat it on the right side, by flipping the tracing paper.


Here is the tracing paper cut out flipped over for the right side of the headboard. NOTE! I did not measure and compare the two sides originally as I should have. You want to measure out some key points from your original side to have the second side match up. For example: the first dip is 7 inches from the top and so many inches in from the side. Then you repeat this measurement on the right side in order to allow for a better tracing paper line up.


Then the Husband cut out the shape. (you can see my original mis measuring goof up with the red marker).


Next came covering the headboard with the gray wool I purchased (could not find a lighter gray linen anywhere that wouldn't break the bank!). After reattaching the quilt padding with our staple gun, I soon realized that I couldn't just staple the fabric over our new headboard without getting some serious puckering along the curves... So my mom graciously came to the rescue and helped me with this stage. And when I say help, I mean she made us a semi-slipcover for our headboard.  And here's how she did it.

She pinned the slipcover to the padding, and then traced with sewing chalk along the edge- to indicate where she would cut the fabric.


Here are two detail shots of where she cut. She gave herself enough leeway for a 5/8 (?) hem.


Then she cut out a strip for the side of the headboard and a faux strip for the back (not pictured).


Here is our daughter helping my mom remove the pins before sewing.


After the Slipcover was made and ironed, we stapled it along the back, along the sides and then at the bottom of the headboard.


Detail shot of the slip cover my mom made.


And here is our completed headboard in our bedroom! We love it!!! Thank you Mom for helping us with our headboard once again.


Note about the area rug, I switched out the floral oval one for this more geometric rug we already had. (not as great as the Anthro Rug- IE not easy to vacuum, but does it's job visually and financially!)

Next up in our bedroom makeover: 

1) We have light gray linen curtains (finally) that I bought from Ikea that need hemming.
2) I'm going to recover our red pillow in a relaxing light blue fabric.
3) One more throw pillow for the bed, in a neutral kaki color linen. (I bought the cover for $12!! at Ikea and I already have the down pillow insert)
4) Artwork: One single piece of artwork for over the bed, I'm on the hunt for a moody landscape photograph.
5) A taller lamp for next to my bed, or a new lampshade for my green lamp, one that isn't so wide and will take up less room (and won't have me feeling like I might knock it over)

I plan on doing a follow up/progress report post later in the week with images of the hemmed curtains, recovered pillows etc, so stay tuned!!


Monday, April 1, 2013

Easter Pictures, from 2013

Hey everyone, I wanted to check in and share some pictorial highlights from this year's Easter Sunday.

Above: our daughter's genuine reaction to her first jelly bean.


Saturday night I had a bit too much fun assembling her Easter basket! I might have gone a tad over board this year... and for a few reasons. This "to-do" got caught up in my general nesting to dos and thus had been in process for a while... accumulating little bits here and there! Also I was subconsciously worried that if the baby came before Easter, there was a possibility that her basket might take a back seat. Hence the extra planning. But mostly, these things are fun to do with our daughter as each year she is more capable and interested in new things.

I knit her two bunnies (that went into the plastic eggs for the egg hunt). We also found some tasty organic jellybeans and lollipops at our local orchard that also went into the plastic eggs (along with some pennies, and hair bows).


In her basket went a little potted plant for her to plant outside, 3 wooden eggs, a chocolate bunny, a no spill bubble thing, a pink sun hat, three nature/spring themed books, and a vintage wooden puzzle.


She was pretty pumped.


We spent Easter lunch at my folk's house where we had some incredibly delicious lamb, and coconut cake for dessert!


There was a second Easter egg hunt at my folk's house. It was a lot of fun to watch her look for eggs.


It's pretty wild to look back on the past two Easters and see how much she had grown and changed...! and Next Easter there will be two baskets to fill. pretty wild!


Have a great Start to your week!

A Love Letter to Spring


Happy April!!

After the past few days I feel like I can officially says it's Spring around these parts. The flowers are really sprouting up everywhere, the days are noticeably longer and not as many layers are required when venturing outdoors.  I hope you had a lovely Holiday weekend. Stay tuned for a little Easter recap from our end later in the day. For now Enjoy this week's tiny Love Letter to spring!


LinkWithin

Related Posts Plugin for WordPress, Blogger...